30/03/2017

Final Edit

I went back into the edit of my film, looking at all the feedback I got from it. I tweaked some of the sounds, making the film louder as some of the levels were too quiet. I also raised the volume of the music as it was quite quiet in some parts. I then played back the edit and the boost in volume makes the film sound much better as you can hear the dialogue much better.

I also updated and made the second part of the title glitch, using the RGB split and flicker effects in After Effects. I went about the glitch effect in the same way by duplicating the previous composition of the other titles, and changing the text and altering the glitch effect, so the timings of the glitch and colour split are different to the other title. I then placed the composition into the main composition using the motion tracking camera, I then stuck them to the lines in the road, like they were originally. After playing back the first bit of the title sequence, the glitch effect on both titles looks a lot better than just on the first one.

I then altered some of the colouring of the footage. I decided to make the tints on the footage gradually get stronger as the film opening progresses. I raised the opacity between cuts making the opening get more and more blue as the narrative gets to the main attack scene.

Overall, I am happy with the final edit of the film and I think that the sound, editing and camerawork in the opening work really well together. After adding my ident to the start of the film helps to set the mood of the film due to it being dark, cold and the sound on the ident being really atmospheric. I think that the ident helps to make the film look much better. 

21/03/2017

Creating the Ident

When filming the footage for the ident, I experimented with lots of different pans, shot lengths, shot types and so on. I could then choose out of all of the footage, which would be best for the ident.

To create the text for the Prime Productions logo, I found a horror style font from the internet, and created a 3D model within Cinema 4D. Within C4D I modelled a title that looks good and that could be used for an ident logo. I then imported the C4D project file into Adobe After Effects, so I could use motion tracking to make the title stay in one spot, as if it was actually there in the footage. Using the built-in Cinema 4D plugin, within After Effects, I could select the renderer of the text, and alter settings of the render using the built in parameters, from the plugin.

I then hid the 3D text layer and tracked the camera from the footage within after effects. After AE had done its magic, I could then create a 3D solid, where I would want the text to be, and the camera on the timeline. I then created null layers where AE camera tracked, so I could lock the text onto the right point. I then exported the camera and the null layers from AE into a C4D project file, so I could build the text in the right place in the environment. I placed the text in the right place on one of the null layers, altering the rotation, position and scale so the text looks good in the ident. In C4D I could import the footage to a background and add the video as a material. This is so I could sync the text positioning with the footage. After syncing the text, I deleted the background layer, I then re-imported the C4D save back into After Effects so I could combine the 3D object and the footage together. I then textured the logo to a horror style texture so the text looked better.

I imported the camera and null object layers into Cinema 4D, rather than importing the text straight into it, so the camera would move around the text. This makes the text look like it is in the scene and makes it look more realistic. If I just imported the 3D text into after effects with the camera looking straight at the text, it would look unusual as the text would be looking at the camera all the time. By exporting the camera into C4D I could import the save into AE so it looks like the camera moves around the text.

After sorting out the 3D text, and the motion tracking. In After Effects I used the colour correction effect, to make the footage have a blue tinge to it. This follows the typical horror conventions, making the ident relate to the genre, the setting and the narrative of the film. Using adjustment layers I could then apply effects to the whole scene, making the ident look a lot better.

I then masked the trees that come in front of the camera so I could hide the text behind them as the camera pans past. This is so the text does not come on top of the trees making the difference in foreground and background non existent. I then animated the positioning of the masks as they need to  follow the trees as they move past. I could have done this using the built in motion tracking but thought it would be quicker to just key-frame the positioning of the masks. I key-framed the masks instead of motion tracking as the trees that come in front of the camera moved past quickly and the it is quite a smooth movement.

Using colour correction, altering the levels and contrast of the scene, I could control how dark, or light I wanted the scene to be. I made the footage more blue to apply to the conventions and made the forest much darker than the original, to set the mood of the clip.

This made the setting look much more atmospheric and helps for it to apply to horror genre conventions.


I then added a smoke effect to the scene, using stock footage. I altered the blending options so the original footage would show through the grey background. I then RAM previewed the footage, but I did not like that the smoke effect was viable when the tree was moving past, the camera.

I then masked the tree key-framing the position of the mask so it would move with the tree. Basically like the other mask to hide the Prime Productions logo. I then inverted the mask so the footage would only play outside of the mask. I then previewed the compositions again, and found that I did not like the fact that the smoke effect was there before the wipe of the tree. I then altered the positioning of the mask so it covered the other section before the wipe of the tree. This then make it so the smoke only appeared after the tree had wiped past. I then feathered the mask so it would blend and fade out on the edges so you could not just see a distinct line, which looks unnatural.

Through out the process of making the ident I experimented with different textures for the Prime Productions logo. I prefer the red metallic type look to the logo. All the previous textures I used were supposedly plastic but when I changed the text to a metal, it thought that the dull metallic texture looked a lot better.

I then made a new composition and created particles with the trap-code particular plugin. I could then select certain presets in the options interface. After making particles that would be appropriate for the scene by setting the fade in/out, sizes, etc, I altered the parameters on the plugin to perfect them. I then added this composition onto the main composition with the logo and footage. I previewed the composition and realised that did not look to good as the particles just moved around which looked like they were on the lens of the camera. I then used the motion tracking camera from the text and made the composition layer 3D. I then moved the position of the composition so the particles looked like they were in the environment. I had the same issue with the camera passing the tree, as it looked weird when the particles moved onto of the tree, which destroyed the perception of the 3D environment. I then masked the tree on this layer and inverted the mask so the particles would show everywhere but the mask. I then previewed the main composition again and making the layer 3D made it look a lot better. I then reduced the opacity, and made the particles look much more blurry, using the plugin. The particles moved within the environment and made the ident look a lot better, after adding this effect.


I then went onto making the sound for the ident. I wanted a mysterious ambient sound in the background to connote the horror genre, I also added a deep bass effect when the text entered the screen. I rendered out the composition from after effects and imported it into audition so I could link the sounds with the time things happen in the visuals on screen. I then altered the levels, volume and changed the pitch of the tracks. I also added a glitchy type sound when the text glitches, and flickers.

I then exported the audio to Premiere and added the footage. I then added a colour correction to make the footage look more blue which applies to typical horror conventions and rendered the final ident.


10/03/2017

Title Sequences

When I was looking at typical horror title conventions, it seemed to vary depending on what type of horror film it was and what was going to happen in the film. Lots of the films tend to use dark colours and made the titles contrast with the footage behind. When researching titles I liked the look of The Hunger (1983) for their simplistic but effective titles. I liked the font that they used for the titles and I think that this type of font could work really well in my production.

I also looked at the Evil Dead's title sequence. I also liked this simplistic font style. The font and the combination of the roots within the text makes the titles look really good for the film. As the colour contrasts the background it helps to stand out making the viewer concentrate on the title. The edges of the letters fade of into black which connotes that beyond the title it is unknown which I would assume (due to me not personally have seen the film) foreshadow the film. The fading on the edges of the text really adds to the titles and makes them have a horror feel to them, due to title applying to similar conventions.

For my title sequence I would like to use a similar font to either of these example titles and add this root type effect to the titles. I think that the roots on the text would relate to my film due to it being set within the woods.

To create the titles for my film, I used a simple thin font style like the hunger film font, I then had the idea of motion tracking the titles, to the footage from the film. I created a new composition for the titles themselves as I wanted to add effects to them. To make the look more impressive and so they related to the genre, I make a RGB split and glitch for the text, so the text glitches in and out of the shot. I then made the colouring split to a light blue type colour, rather than a red or green, so it applies to the genre colour conventions of horror. The titles then flicker and glitch randomly.


To create the RGB split I duplicated the layer twice and extracted only the red, green, and blue colours on each layer. I then used the wiggle function and set the amount to wiggle 10 times the amount of a slider effect that can be set, using the pick lock tool (The slider is a parameter within the wiggle function, to determine how much wiggle to give to the layer. The wiggle is a built in function within AE. I applied the code to the position key-frame.) To create the glitchy and fuzzy I used a TV effect, which made the font have a fuzz. I then masked part of the text which made parts of the text fuzzy and parts not, so the text is still legible.

I then imported the composition into the motion tracked footage composition, made the layer 3D and placed the text in the right place. I added a fade in and out, for the text, making it look better.

When the camera pans around I also motion tracked some text to the road so it stood up after the car had driven over it. I also added another layer of the same text, on a different angle, and stretched it, so it simulated a shadow for the text. This text also fades in and out at the same time of the other standard text.

I decided to use different compositions and imported them into the other compositions, to help keep my timeline clean. The fuzzy and RGB split effect to the titles was all done in a separate composition to keep the other timeline clean. I then just imported the compositions with the footage, and I could then just alter the settings and parameters in that composition and it would update the text in all if the other compositions.

I then went onto making the title of the film for the end of the opening, recreating a similar title sequence to the Evil Dead title sequence, I chose a font for the text of the title and imported it into After Effects. I then added the roughen edges effect to the text so I could make the text look like it was dissolving away. Using key-frames I made the text disintegrate over time. I converted them to the easy-ease type of key-frame and using the graph editor in AE I could then alter the speed between the two key-frames so the effect would change at a different rate over the frames in the scene rather than one standard speed, across the time.


I then added images of silhouette tree branches to overlay on the text using the blending options, I manipulated the image in Adobe Photoshop removing all of the white background on the image. I then imported the image back into After Effects. As you could see the tree branches in the background, I masked the text so the image layer would only effect the text and not the background.

I then added the gradient ramp effect in AE so the text would fade out on the edges of the text, making the title look much better, especially for the horror genre. I altered the settings on the effect, changing colours, the positioning of the gradient, the direction of the fade so the text fade would look better. I then key-framed the opacity of the text so the text would fade in and out of the black screen.

After making all of the effect perfect, I then added a zoom for the text. I added a camera into the scene, selecting a 50mm lens so the text would have a sort of blur to it when it was too close to the object. I made the text a 3D layer so the camera positioning would effect what you see onscreen. I key-framed the positioning of the camera so it would slowly zoom into the text. As time progresses, and the text starts to disintegrate, the zoom becomes faster, making helping the text fade out.

Soundtrack, Dialogue re-recording & Editing

After all of the feedback from the rough cut, I started to go back and edit the footage to alter the edit. As most of the sound in the footage was not usable, I have had to re-record the characters dialogue. I have then had to alter the levels of the audio so the sound is not too loud, for the shots. When I exported the dialogue and added into the edit in Adobe Premiere Pro, I realised that the sound needs other background noises and things like wind from the original clip to sound believable. Without these background noises the audio sounds too much like it was recorded some where else, like a voice-over, which is not what I want the viewer to assume. Using the audio from the original footage I have placed background noise behind the dialogue, which then makes the audio sound more believable. I then altered the pitch and levels of  the sound to fit the environment for the film. I then added effects to the audio so they sounded like audio was not re-recorded.

Some of the audio from the footage, was fine to use within the edit, but there were some pops and cracks in the audio and other background noises which would distract the viewer. I then ripped the audio from the footage in Adobe Media Encoder and imported into Audition. I then altered the levels and removed the pops, by deleting them from the audio waves. Due to the pops only being really short, you can't tell that they were there, and the dialogue is still synced with the visuals.

After re-recording sound of the characters talking, I looked into music for my production. I researched online of typical horror genre conventions of sound and music. I looked at examples of this in other films, to give me inspiration and ideas for my own creation of music.

To build a soundtrack, I downloaded lots of horror sounds (screeches, whirls, etc.) and layered all the sounds together in Adobe Audition to make a horror sound track. Within the program I set some sounds to repeat, creating a base track of howling wind and ambient sounds. I then added screeches on top to build suspense within the music. Then layering more and more tracks and sounds on top of the base sound track to build the music and tension in the music. I then edited some of the individual sound clips to be louder, some quieter, and creating fades (in and out) for the clips of sound. Adding all these effects and layering appropriately, made the music for the film sound really professional, and make the final cut of the film sound much better. The music helps to build to tension for the opening, and make the viewer feel that they could be in this situation. Without the music the film was good but the soundtrack makes the opening much better, especially linking with the visuals. I then edited the soundtrack around the edit of the visuals, to make the sound link and synchronise with the footage onscreen. I rendered the cut and imported it into Adobe Audition, with the program you can then move sounds to sync them with the pace and narrative of the film. After syncing all the sounds to the visuals and exporting the track from Audition, I imported the soundtrack into Premiere.

Within Premiere, I could then alter the volume of the soundtrack appropriately, so when the suspense of the film increases, I raised the volume of the soundtrack to sync with the film. Using key-frames I adjusted the volume of the soundtrack making it louder to build the suspense and quieter when the characters are talking. The soundtrack really adds to the film improving, the shots with no dialogue and the whole film in general. The audio key-framing in Premiere helped to control the audio volume and levels without having to alter them in Audition.

I have also cut down some of the footage in the cut that was lingering that could potentially cause the viewer to become bored, making the film slow. I have also removed some mistakes in the edit. One of the shots contained a car in the background and when it cut to the next shot it was not there. I resolved this by cutting down the clip so the car was not seen.

Audience Feedback

After showing my first cut to potential audiences of the horror genre and my production, some people gave feedback on the film. As some of the footage did not have the right sound and dialogue in, I have had to add in the sounds recorded afterwards so the dialogue would exist but it was not part of my first cut. As some of the sound of the footage was not very clear due to the wind and other background noises, some of the dialogue was distorted and not clear to understand. Some people said that the sounds between shots varied in volume, which disrupts the viewer. This is because of the positioning of the camera, as some shots made the microphone point into the wind making the background noise louder. Also some scenes in the forest were more sheltered therefore the microphone on the camera did not pick up as much volume. I have then gone back into the edit and either raised of lowered the volume of the sounds in the shots. Ideally I would like to export all the audio and take it into Adobe Audition, so I have full control and more freedom with adding effects and changing levels of the sounds. I can then manipulate the audio the try and keep it all the same volume so it is consistent throughout the film opening.

Another point that audiences made was that the first few shots in the car were too long. I then cut down the length of the shots in the car so the viewer does not get bored within the first few seconds of the opening.

Another point was made about the different shots and angles of the characters. The audience said that the shot types and the shot reverse shot sequence was good and helped to give the film more narrative for the viewer. The dialogue between the two characters, helped to display the story for the viewer. Composition was something audiences mentioned as they liked the framing of the characters in the conversation. Angles were thought about carefully to give the idea that the female character holds the power in the scene therefore the camera looked up at her and down on her husband.

02/03/2017

Location, Cast, Props, SFX & Mise en scène

Location
Due to my idea coming from this one location, I have only had this one location in mind, for filming. Because of the dark, thick forest and there being a smashed up abandoned cabin. This makes it a perfect location for a horror film, as the setting being very similar to other horror film settings, therefore applying to horror genre conventions.

The cabin for the film is a perfect location for the narrative of the film. Due to its isolation, atmospheric location makes it perfect for the opening scenes of the film. The image shows the cabin and the caravan opposite all smashed up and broken. When I was taking the photos in the woods, it felt isolated and looked very dark making it perfect for the films plot.

Due to the forest being quite muddy makes the plot more interesting and more believable that the cabin is difficult to get to. An overcast or misty day, would make the scenes of the film look better as it would make the scenes look a lot darker, making the viewer believe that the two characters are in trouble.

All of the shots for the film will be shot in this location, to keep shooting and scheduling simple, and because there are plenty of potential areas for the different scenes and shots for when the characters walk to the cabin. Due to there being a huge amount of woods, makes it a perfect location for the opening as there are multiple angles and settings for the shots for the film.

Cast and Character, Props, Special Effects
The central protagonist is Aaron the university professor that is doing historical research into the area. His wife Jess has come with him to stay in this isolated cabin where he is doing his research. When she realises that the cabin is all smashed up, she isn't happy.

I think that my cast is good for the roles and characters in the film, because I decided character based on the cast I had available to act in the film. I think that the cast looks believable for the films narrative as the type of character suits the age and culture of the cast.

There will be minimal props in the film as most of the opening consists of the journey to cabin. The male character will be wearing a rucksack, containing equipment for his research. Outdoor clothing will be on the characters as they walk to the cabin. As it is a cold grim day to walk to an isolated cabin.

There will be minimal special effects in the film as the narrative is quite realistic and does not contain any sort of science-fiction characters/aliens etc. The only sorts of effects added onto the footage will be blurs and colour levels, for the shots from the perspectives of the stalker.

21/02/2017

Shoot One

This first shoot went well as I got pretty much all of the footage needed for the film. The handheld shots, and the steady shots.

Due to the day being quite cold, overcast and sometimes raining/snowing, made the narrative more believable as it really emphasises the fact that the cabin is grim to get to.

Most of the steady shots as the characters walk to the cabin, worked really well, due to the environment and weather, making the shots look really atmospheric, and realistic. Some of the handheld shots may have to be re-done, due to focusing and quality issues. These tend to be on the shots where the camera is moving, and in an environment where lighting is minimal, inside the forest.

The establishing shot of the car as it drives up the road towards the lay by was not as good as I would have liked it to be due too not having a dynamic head on the tripod. Therefore the pan of the car as it moves around the bend is not as smooth as it could be. This is one of the shots that I would like to re-do on the next shoot. In this shot I took down the aperture and ISO of the camera due to there being more lighting than the other shots in the woods. A high depth of field was set so the moving car would be easier to focus.

For most of the shots in the woods of the cabin and the forest path I set the ISO to a higher value, to let more light on the sensor of the camera. I made sure not to set the value too high to reduce a grainy image. To get maximum light from the surroundings, I also increased the aperture, to open the lens of the camera to let more light in. This then made the image much brighter and not too dark so the viewer could not clearly see what was going on. I also set the white balance of the camera so the film did not look too orange or blue, and so the colours look correct.

For this shot the two character walk up the path, due to them walking away from the camera, I set the camera to a high depth of field meaning most of the shot was in focus. Lighting was also readily available so the ISO and aperture was set to a lower value, to reduce grain in the image.
I wanted the composition of this shot so the path was in the centre of the frame. The positioning of the characters (mise-en-scene) as they walk up the hill were carefully thought about as the male character walking on the left side closer to the dark forest where as the female character on the right closer to the bright light side. The bright light connotes innocence which foreshadows what is going to happen later on in the film, as she is an innocent female that gets attacked. Whereas the dark connotes evil and also foreshadows what he is getting the female character into, due to him taking her there.

This next shot of the two characters as they walk towards the cabin shows how grim the weather and the environment is. The composition of this shot is good as it keeps both of the characters in the frame with enough spacing around them both.
The mist in the background of the shot emphasises the fact that it is a grim day, linking back to the narrative of the opening scenes. Like the other shots, the aperture, ISO, and depth of field were all similar to the other shots.

For this next shot, the two characters walk into the scene, and are shocked by the state the cabin is in. Due to the lighting being minimal again, the ISO and aperture was set to a higher value.
For the composition of the shot I wanted to leave enough space for the characters to walk into the scene, and also include the vandalised cabin within the shot. I decided to purposely not put a gap between the cabin and the edge of the frame as it would look strange, and and the composition would be incorrect. I decided to shoot from this angle, so the characters can walk into the scene showing the viewer the state of the cabin before the characters get to see it.

For this next shot of the conversation I decided to leave quite a lot of room around the characters, but also framing the female character within the smashed door frame.
For this conversation I use over the shoulder shots with the combination of shot reverse shot and switch to the different shots depending on who is talking in the scene. I used the 180 degree rule to tell to the viewer that this conversation is ongoing. Because the female character is angry with her husband at this point in the film. I purposely decided to extend the tripod, raising the camera, looking down on the husband to show who holds the power in this scene.

For the other reversed shot, the camera looks up at the female character making her look more powerful than her husband, because she is angry with him.With both of the shots composition, I decided to show other things in the scene, in the background of the shot.
The first shot shows the smashed up caravan, to emphasise the fact that she is angry. The other shot shows the dark thick forest to shows to the viewer how isolated the cabin is. The ISO and aperture were set high due to minimal lighting in the scene.

For this shot I thought that the composition and framing was good because of the angle and spacing around the characters. The characters walk through the long shot and due to the lighting being more available, the ISO and aperture were not a high as the other scenes.
I manually focused onto the characters and used a high depth of field due to them moving, so I did not have to constantly refocus as they got closer to the camera. I think the conditions in this shot look really good. Because it was misty and raining, it makes the narrative look more realistic. I purposely added the snow in the foreground to show to the viewer that it is not a nice day to walk to an abandoned cabin.

For this cutaway shot, of the vandalised caravan, I set both the aperture and ISO to higher values due to minimal lighting, in the forest. For this cutaway shot I made sure that the composition was correct, allowing space around the caravan, but also looking at the target at an angle to make the shot look better.
In my storyboard I did not plan any cutaway shots. But when shooting, I thought it would be a good idea to include one in the opening, to simulate the fact that time is passing. Due to the caravan being smashed up and spay painted connotes that the place is not looked after, creating certain ideas and feelings for the viewer.

For the handheld and moving shots I tried to set the focus so as the camera moves, most of the frame is in focus. I also used a high depth of field so the foreground and background was all in focus. I also set the aperture and ISO appropriately for the environment and available lighting in the scene.

The handheld shots were different angles and scenes of the two characters as they journey towards the cabin. The style of the shot was suppose to simulate that they were being watched, and something bad was going to happen. The shots were taken low to the ground to simulate that the stalker was hiding, behind the trees in the forest.

This shot is the last scene of the opening, just as the stalker attacks the innocent female. It is a point of view shot of the female character, as she goes to the toilet. Because the camera moves, the footage is quite shaky, which is what is intended, but it is more shaky that I would have liked it to be. This footage will do in the final cut of the film, but it would be one of the shots that I would like to re-shoot if possible.

Rough Cut & Editing

After filming most of the shots after the first shoot, I have put together the footage that I filmed in Adobe Premiere Pro. I think that some of the footage would work well for the final project and not much needs re-shooting. Due to the day of the shoot being very windy some of the footage had very loud background noise of the wind. This makes the sound of some of the clips unusable as some clips are quiet and some are really loud. The issue is that some of the clips where the two characters are talking, the wind distorts and muffles the sound of the characters.


When editing the clips I realised that I would have to re-record the sound of the two characters when they are talking, due to the environment being too loud because of the wind. This will then have to be added on top of the footage. The recordings will ideally have to be lip-synced, but most of the shots are not that close-up therefore, viewers probably will not be able to see if the recordings of dialogue don't quite match.
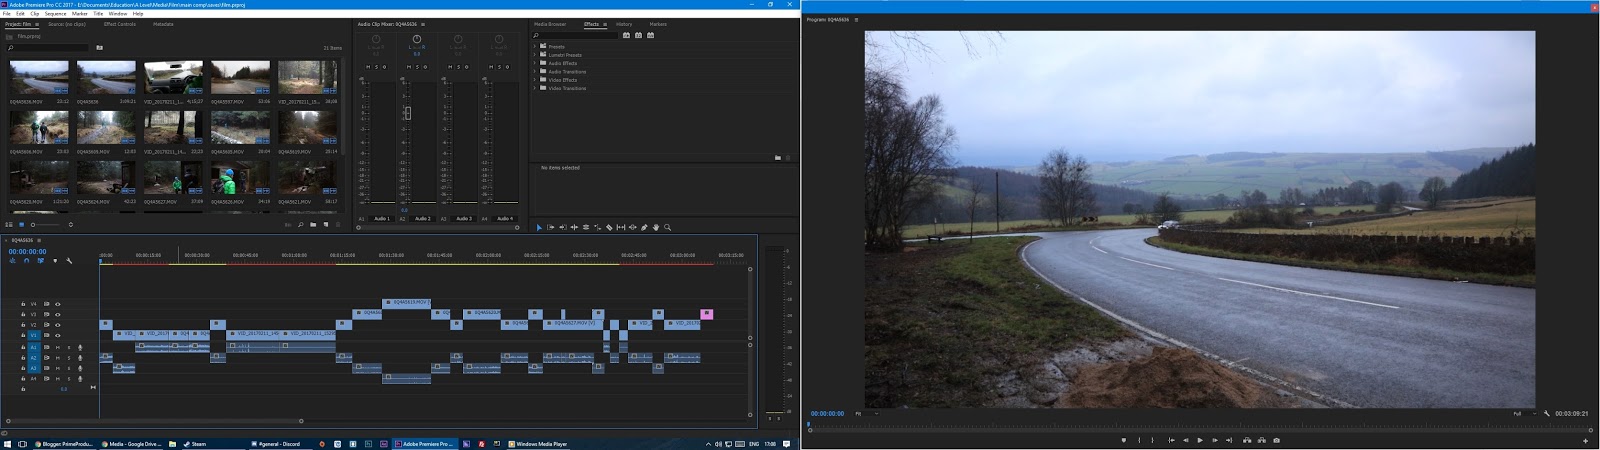
This first cut of the footage mainly focuses on the cinematography of the film as I have not edited the sound for the clips together. After cutting the footage together, it helped me to realise that some of the weak footage can be removed from the final cut, and what need to be re-shot. It also helps me to see that I have filmed enough footage for most of the film opening.

For some of the footage I have started to edit and add effects to it. Using Adobe After Effects, I have started to use colour correction and altered the levels and brightness, to make certain shots fall to the blue end of the spectrum, to suggest that some thing is going to go wrong. Very popular in other horror films and therefore applying to the genre conventions. I have added this effect to the shots that are handheld, the shots implying the perspective of the stalker. Adding the effect to only this shot helps to tell the viewer that something is about to go wrong, foreshadowing the future.

15/02/2017

Test Footage

As my inspiration for my film came mainly from the location, I still had to scout through the woods for suitable shots for the film, as the characters walk through the woods.

For this first shot, it shows the lay by that the car drives into as they get to the edge of the forest. For the actual film I would want the angle of the shot to be different so you could see more of the lay by, when the car pulls in. Although this angle of the shot is not quite correct, it shows the type of shot I would be looking for, to create this idea.


The location of the cabin is perfect for my films genre and narrative. Due to it being isolated and the woods being dark, helps to suggest to the viewer typical horror conventions. I think this shot is a perfect angle of the cabin, as it shows how smashed and damaged it is. The spray paint all adds to the effect of it being vandalized. The shot also shows quite a lot of the woods around the cabin. As the forest is really dark, it helps to make the shot more atmospheric, simulates to the viewer the fact that they are in the middle of nowhere.

When the two characters get to the cabin, they camera shows the damaged cabin. This shot shows both the broken cabin and the broken caravan. Due to it being in the forest, it being dark, helps to make it more atmospheric.

For this shot the camera shows where the characters would walk to get to the cabin. With the mud shown in the shot helps to show to the viewer that it is difficult to walk through.
This location is perfect for the characters when they walk to the cabin, as it simulates the fact that it is difficult to get to the cabin, making the story more believable, and following the typical horror genre conventions of isolation.


There will be multiple shots of the characters as they walk through the woods to get to the cabin. this shows how dark the forest is, perfect for the horror genre. The scene is quite atmospheric which helps to add to the film. This makes the viewer relate to the characters if they were in this situation.

I think that this shot shows the two characters walking away from the car to the cabin really well. as they are quite far away, it suggests that they are being watched, stalked, which is the story behind the film.